由于囊中羞涩,reizhi 一直在使用黑群晖作为家庭存储方案。不知何故,几天前突然提示存储空间已损毁。这种情况下白群晖是可以直接联系技术支持的,无奈我只好自己想办法解决。而网络上搜索到的教程和案例都是使用 Ext4 作为文件系统,那么只需要用 UFS explorer 来修复就好了。偏偏我是用的是 Btrfs 文件系统,于是只好爬问研究。最终通过三天时间的反复尝试,成功将所有数据挽回,在此分享一下经历和经验供日后参考。
如果你也遇到了类似问题,完全不用急着慌张。虽然 Btrfs 相比于 Ext4 并没有任何稳定性上的优势,但经过多年的更新和改进文件系统已经比较完善,再加上 RAID 的数据保护,丢失文件的几率并不高。
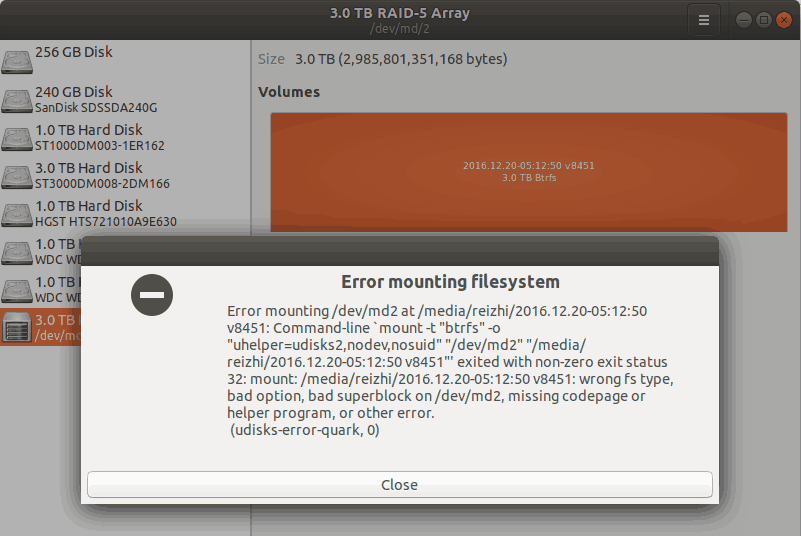
如果你的群晖提示存储空间损毁,但 RAID 并没有异常,可以无需进行 RAID 清理。通过查看 S.M.A.R.T 状态,发现所有硬盘均处于健康状态,于是跳过这一步。接下来我们需要引导到 Ubuntu 系统并尝试挂载 RAID ,此时既可以使用原有机器,也可以将所有硬盘连接到其他机器中操作。在原机安装 Ubuntu 时请注意不要将系统安装至存有数据的硬盘。安装镜像以及教程可以直接在官网获取,这里便不再赘述了。另外由于恢复过程耗时较长,不建议使用 LiveCD 来操作。
安装完成后的第一件事是安装必要的工具包以及挂载 RAID,打开终端并以 root 身份(sudo -i)执行以下操作:
apt-get updateapt-get install mdadm lvm2 btrfs-progmdadm -Asf && vgchange -ay
正常完成后可以在磁盘管理中看到 RAID 阵列,但是由于文件系统损坏,此时是无法挂载的。这里会显示阵列的设备文件是 /dev/md/2 ,记住你的显示值,稍后会要用到。
我们切换回终端,运行以下命令:
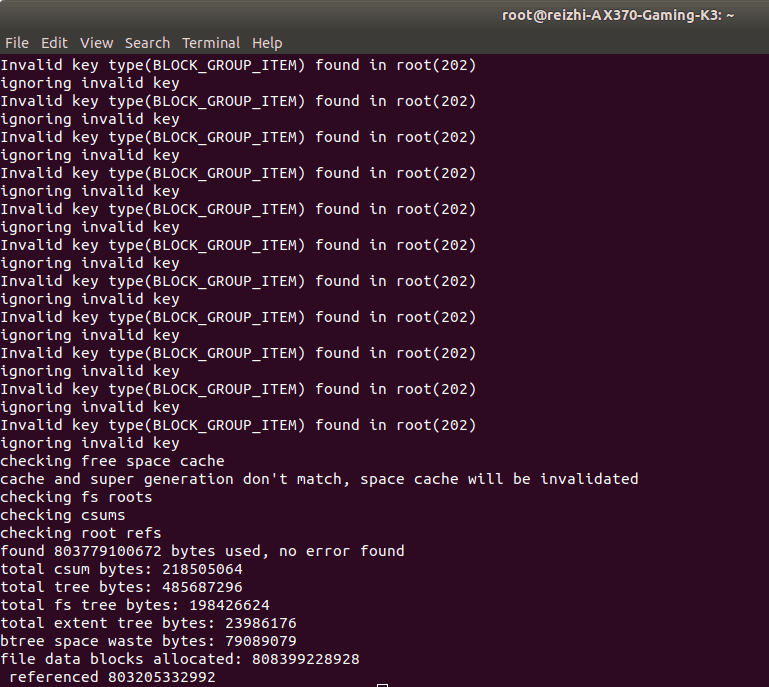
btrfs-find-root /dev/md/2 &> /tmp/root.txt
运行过程可能需要10-30分钟,期间是没有任何回显的。等待运行完成后终端会返回命令提示符,这时我们打开 /tmp/root.txt 文件,可以看到如下内容:

我们需要用到的数据是 Well block 后面的这一串数字,其后的 gen 数字越高,恢复的可能性越大。下一步使用找到的 tree root 来模拟修复,到目前为止的所有操作都不会对硬盘进行写入和修改,也不会破坏任何数据。
btrfs check --tree-root <block> --super <sup>
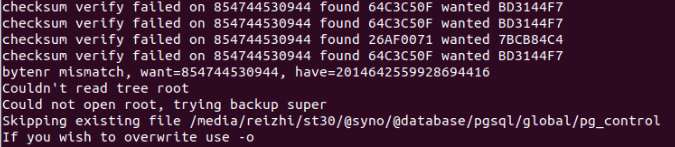
其中 <block> 为上一步中的数值,按 gen 数字从高到低依次尝试使用,<sup> 可以尝试0,1或2。如果 <block> 有效,运行结果末尾应当类似于以下图示:
如果最后回显不是以上格式,表明这一条 <block> 无效,需要继续尝试下一条。在确认看到以上提示后,我们尝试将数据导出。
btrfs restore /dev/md/2 /tmp -D -v -F -i -t <sup>
此时仍然使用上一步中的 <block> 值,将 /tmp 改为导出目录,需要确保留有足够空间存储文件。如果文件名包含特殊符号可能导致导出中断,将目标分区格式化为 Ext3/4 即可。
如果导出正常进行,会看到类似上图的提示,此处没有进度提示,可以自行前往导出目录查看。如果导出失败会给出其他提示,在确认导出分区是 Ext3/4 的情况下,则只能退回上一步尝试其他 <sup> 值。
到目前为止我们并没有对数据盘进行任何写入和修改操作,如果因为种种原因无法导出,或是导出过程异常中断,仍然可以通过修复原盘的方式来挽回数据。不过请注意,此步骤有可能会损坏数据,如果你不能接受任何风险,请停止执行并联系专业机构。
btrfs check --repair --tree-root <block> --super <sup>
使用之前步骤中正常回显的 <block> 及 <sup> 值进行正式修复,确认操作完成后执行:
btrfs rescue super-recover /dev/md/2

提示确认目标分区是 Btrfs 文件系统,否则会损坏数据,输入 y 确认操作。等待数秒后再次回到提示符,如果一切顺利,此时已经可以通过磁盘管理工具挂载 Btrfs 分区了。不过群晖很大几率不会识别修复后的文件系统,还是建议将数据导出后再将硬盘还原。
不看,等我买了黑群在看,先踩下你的空间
跳过黑群买白群了
给dslao递茶
请问 btrfs check –tree-root –super 上block如果是错的,那错误讯息是 no such file or directory正常吗?
应该不会出这样的错误提示
请教博主,模拟恢复结果是referenced 0 那么这个block是有效还是无效?谢谢!
只有referenced 0的话是无效
扫描出来1000多个block值有referenced对应,然后Dry Try 输出发现N多都是重复的。现在正在用一个内容最多的做restore。感谢LZ全网唯一一份群晖btrfs修复教程。事实证明哪怕是白群918+这种plus机型上,btrfs依旧会出现各种各样问题。我这个918+的4x4TB SHR + btrfs 存储空间就是被一对廉价的NVME SSD做了SSDCache,降级堪用后write back错误给毁了。
白群损毁不能联系技术支持吗?中文网确实我完全没搜到任何相关教程,英文相关的讨论还是有一些的。
群晖的技术工程师会帮你尝试强行挂载,然而我这个机器的问题是已经看到存储空间1损毁,他们的解释是文件系统损坏无法修复,只能找数据恢复的公司做。
btrfs check –tree-root –super
使用格式为btrfs check –tree-root –super 0 . 这样对不对 加不加括号。 错误信息为no such file or directory。 是继续尝试,还是命令不对。谢谢
正确示例:
btrfs check --tree-root 12345 --super 0,请注意双横线。另外no such file or directory请注意是否安装了必备的工具包,见文头好的谢谢,我btrfs-prog没有安装上,我再继续尝试一下
btrfs check –tree-root 65530183680 –super 0
using SB copy 0, bytenr 65536
btrfs check: too few arguments
usage: btrfs check [options]
Check structural integrity of a filesystem (unmounted).
Check structural integrity of an unmounted filesystem. Verify internal
trees’ consistency and item connectivity. In the repair mode try to
fix the problems found.
WARNING: the repair mode is considered dangerous
-s|–super use this superblock copy
-b|–backup use the first valid backup root copy
–force skip mount checks, repair is not possible
–repair try to repair the filesystem
–readonly run in read-only mode (default)
–init-csum-tree create a new CRC tree
–init-extent-tree create a new extent tree
–mode allows choice of memory/IO trade-offs
where MODE is one of:
original – read inodes and extents to memory (requires
more memory, does less IO)
lowmem – try to use less memory but read blocks again
when needed
–check-data-csum verify checksums of data blocks
-Q|–qgroup-report print a report on qgroup consistency
-E|–subvol-extents
print subvolume extents and sharing state
-r|–tree-root use the given bytenr for the tree root
–chunk-root use the given bytenr for the chunk tree root
-p|–progress indicate progress
–clear-space-cache v1|v2 clear space cache for v1 or v2
尝试了以下,全部都是这样,为何?
谢谢
试一下在最后跟上你的阵列设备地址,如
btrfs check --tree-root 65530183680 --super 0 /dev/md/2尝试加入设备,btrfs restore /dev/md/2 /tmp -D -v -F -i -t <sup
这一步又卡住了。不折腾了,黑裙退坑。
我扫描出来block有1W多条,请问每一条都要这样操作吗?想想都可怕。
从数字最大开始尝试,依次往下。如果数据没有损坏前几个就可以恢复
感谢博主,block值太多了,使用了文中说的从block值最值,用了2条就基本已经恢复重要的照片,其他的就没折腾了,再次感谢!
btrfs restore /dev/md/2 |/media/ubuntu/Install ‘701262053376’
-bash: /media/ubuntu/Install: Is a directory
btrfs restore: too few arguments
usage: btrfs restore [options] | -l
Try to restore files from a damaged filesystem (unmounted)
-s|–snapshots get snapshots
-x|–xattr get extended attributes
-m|–metadata restore owner, mode and times
-S|–symlinks restore symbolic links
-v|–verbose verbose
-i|–ignore-errors ignore errors
-o|–overwrite overwrite
-t tree location
-f filesystem location
-u|–super super mirror
-r|–root root objectid
-d find dir
-l|–list-roots list tree roots
-D|–dry-run dry run (only list files that would be recovered)
–path-regex
restore only filenames matching regex,
you have to use following syntax (possibly quoted):
^/(|home(|/username(|/Desktop(|/.*))))$
-c ignore case (–path-regex only)
root@ubuntu:~# btrfs restore /dev/md/2 /tmp -D -v -F -i -t 0
btrfs restore: invalid option — ‘F’
usage: btrfs restore [options] | -l
Try to restore files from a damaged filesystem (unmounted)
-s|–snapshots get snapshots
-x|–xattr get extended attributes
-m|–metadata restore owner, mode and times
-S|–symlinks restore symbolic links
-v|–verbose verbose
-i|–ignore-errors ignore errors
-o|–overwrite overwrite
-t tree location
-f filesystem location
-u|–super super mirror
-r|–root root objectid
-d find dir
-l|–list-roots list tree roots
-D|–dry-run dry run (only list files that would be recovered)
–path-regex
restore only filenames matching regex,
you have to use following syntax (possibly quoted):
^/(|home(|/username(|/Desktop(|/.*))))$
-c ignore case (–path-regex only)
qiu jie da. xiexie.
尝试不加参数直接运行
btrfs restore /dev/md/2 /tmp老哥你QQ多少。我加你。搞了3天我实在是蛋疼。
谢谢大佬教程,好不容易 数据恢复到/tmp目录了。结果重启啥也没了,之前的盘也格式化了。
有一点 Linux 基础的话都知道 /tmp 目录是重启丢失的,我在文中也有提到将 /tmp 改为导出目录。
建议你使用 Disk Genius 恢复已删除分区看看,如果只是操作了格式化,恢复的几率还是很高。找数据恢复公司也来得及。
大神你好,请教一下,我的情况是这样的,黑群918+,SHR+ext4分区,因为电源掉电,导致掉盘了,然后手贱点了修复,然后又强制重启,更换电源重启以后,发现存储空间已经完全找不到了,存储池空间显示为0。
请教一下,这种情况采取什么恢复工具和恢复方法比较好?
我看你到说ext4可以使用ufs进行恢复,在网上找了很久也没有找到相应的教程,麻烦指导一下应该怎样搜索。
谢谢。
SHR无非是混合RAID,建议你先挂载到Linux系统上看一下分区情况,当然win也可以。
UFS explorer 的使用教程软件官网有
太感谢了,全网最详细的btrfs 恢复的中文教程了!
ash-4.3# btrfs check –tree-root 925630464 –super 1 /dev/md4
using SB copy 1, bytenr 67108864
parent transid verify failed on 925630464 wanted 884 found 883
parent transid verify failed on 925630464 wanted 884 found 883
parent transid verify failed on 925630464 wanted 884 found 883
parent transid verify failed on 925630464 wanted 884 found 883
Ignoring transid failure
Syno caseless feature on.
Checking filesystem on /dev/md4
UUID: 0f2666e3-5675-468f-a7a9-10b665829455
checking extents
checking free space tree
checking fs roots
checking csums
checking root refs
Transid errors in file system
found 176617787392 bytes used err is 1
total csum bytes: 169620768
total tree bytes: 527695872
total fs tree bytes: 331579392
total extent tree bytes: 18268160
btree space waste bytes: 61811390
file data blocks allocated: 176090091520
referenced 176090091520
———————————————————————–
正在照着做,感觉快成功了
有一些命令可能随着时间原因有些许改变,有报错的话可以 -h 自己看一下。
放弃了,自己手动删的恢复了,Jellyfin 中误删除的整个文件夹还是找不到。
root@luofei-virtual-machine:~# btrfs check –tree-root 770064384 –super 1 /dev/md127
using SB copy 1, bytenr 67108864
parent transid verify failed on 770064384 wanted 2253085 found 2253098
parent transid verify failed on 770064384 wanted 2253085 found 2253098
parent transid verify failed on 770064384 wanted 2253085 found 2253109
parent transid verify failed on 770064384 wanted 2253085 found 2253109
Ignoring transid failure
Couldn’t setup extent tree
Couldn’t open file system
root@luofei-virtual-machine:~#
上一个没换行,我重新发了看看
https://stackoverflow.com/questions/46472439/fix-btrfs-btrfs-parent-transid-verify-failed-on
你可以参照下这篇文章,或者按照报错提示搜索看看。
我不是专业做数据恢复的,没办法提供深入指导。
ERROR: transid errors in file system
found 296381579264 bytes used, error(s) found
显示这一段是不是说明要用 –btrfs check –repair –tree-root –super 这个命令才能不报错?
试下换其他的
唉试了很多,走到尝试修复的时候提示只读,无法修复